
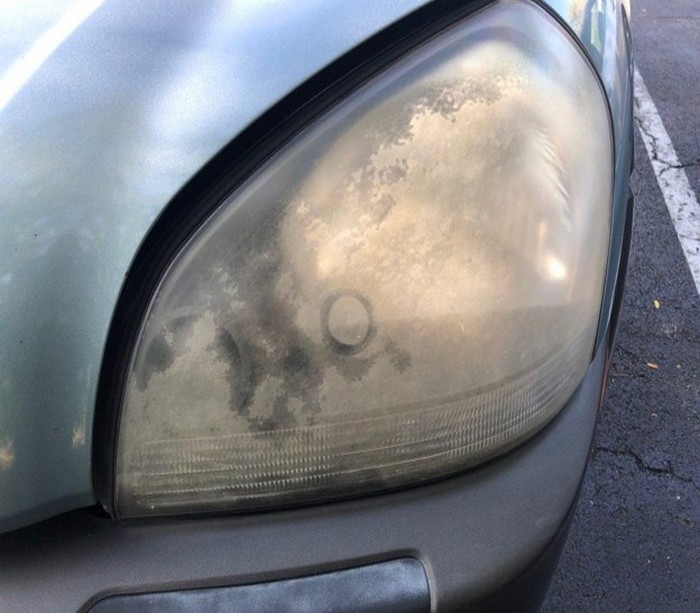
How to inspect headlights for oxidation, yellowing, and damage is the first step toward deciding whether your vehicle needs professional restoration or a different repair.
Cloudy lenses can develop gradually, making it easy to overlook changes until nighttime visibility becomes a concern. A careful inspection helps you identify exterior oxidation, surface scratches, cracks, and other problems before choosing a restoration method.
At Headlight Hero’s, we encourage drivers to examine their headlights before selecting a treatment. Although many plastic lenses respond well to professional restoration, internal damage and severe physical defects may require additional attention.
Why Inspect Headlights for Oxidation Before Restoration?
A headlight lens protects the lighting components and helps transmit light onto the road. Over time, sunlight, environmental exposure, road debris, and wear can damage the lens’s exterior surface.
A proper inspection helps you:
- Identify yellowing, chalkiness, and surface haze.
- Distinguish oxidation from cracks or deeper physical damage.
- Determine whether sanding and polishing may improve the lens.
- Recognize internal moisture or lighting problems that restoration cannot correct.
- Establish a baseline for comparing the finished result.
For the complete process, read The Complete Mobile Headlight Restoration Process: Start to Finish
Step 1: Examine the Lenses in Good Lighting
Park the vehicle safely in a well-lit area. Inspect both headlights in natural daylight, then use a bright flashlight if necessary to reveal surface imperfections.
Look for these common signs:
- Yellowing: The lens has developed a yellow or amber tint.
- Oxidation: The surface looks chalky, faded, or rough.
- Hazing: A cloudy film reduces the lens’s clear appearance.
- Fine scratches: Small marks scatter light and affect the finish.
- Uneven discoloration: Some areas appear clearer or more damaged than others.
Next, compare both headlights. Different levels of exposure, previous repairs, and lens condition can produce uneven results.
Step 2: Separate Exterior Oxidation from Internal Damage
Exterior oxidation usually affects the outer plastic surface. You may notice a cloudy appearance, roughness, or yellowing that remains after an ordinary wash.
Internal problems look different. Condensation inside the assembly, damaged reflectors, burnt components, and internal discoloration cannot be corrected by exterior sanding alone.
Check for cracks, chips, broken mounting tabs, and water accumulation. If you notice persistent condensation or electrical problems, arrange an appropriate automotive inspection.
Step 3: Check the Surface and Surrounding Components
Examine the headlight perimeter, seals, and nearby trim. Look for peeling protective layers, deep scratches, impact marks, and signs of previous repairs.
Do not scrape the lens with a sharp object or use aggressive chemicals to test its condition. These methods can create damage that complicates restoration.
If the lens appears suitable for restoration, the next stage involves careful washing and preparation. Read our guide to cleaning and preparing headlights for restoration.
Step 4: Decide Whether Restoration Makes Sense
Many headlights with exterior yellowing and oxidation can benefit from professional restoration. However, severe cracks, internal damage, extensive pitting, or failed lighting components may require repair or replacement.
A simple inspection cannot guarantee that a lens will become completely clear. The final result depends on the damage, lens condition, and suitability of the restoration process.
Quick Headlight Inspection Checklist
Before booking service, check the following:
-
Both lenses show yellowing, haze, or oxidation.
-
You have inspected the lenses in good lighting.
-
You have checked for cracks and deep impact damage.
-
You have looked for internal moisture.
-
You have identified any lighting or electrical problems.
-
You are ready to request a professional assessment if needed.
Inspect Headlights for Oxidation: Catching the Problem Early
A driver notices that one headlight looks more yellow than the other while washing the car. At first, the difference seems cosmetic.
A closer inspection reveals exterior oxidation on one lens and a small crack near the edge of the other. That distinction helps the driver pursue restoration for the oxidized lens while arranging a separate assessment of the damaged assembly.
The lesson is simple: inspect first, then choose the appropriate solution.
Schedule Your Mobile Headlight Restoration
We bring our professional headlight restoration service directly to your home, office, or other convenient location. Experience the convenience of professional mobile service and enjoy clearer, brighter headlights without leaving your driveway.
For more information about our services, visit us on Pinterest, TikTok, Instagram, Facebook, or YouTube.
Contact Headlight Hero’s today to schedule your mobile headlight restoration and experience the convenience of professional service brought directly to you.
Visit Online Booking to book your headlight restoration today and see the Houston sun reflect off headlights that actually look new again!


